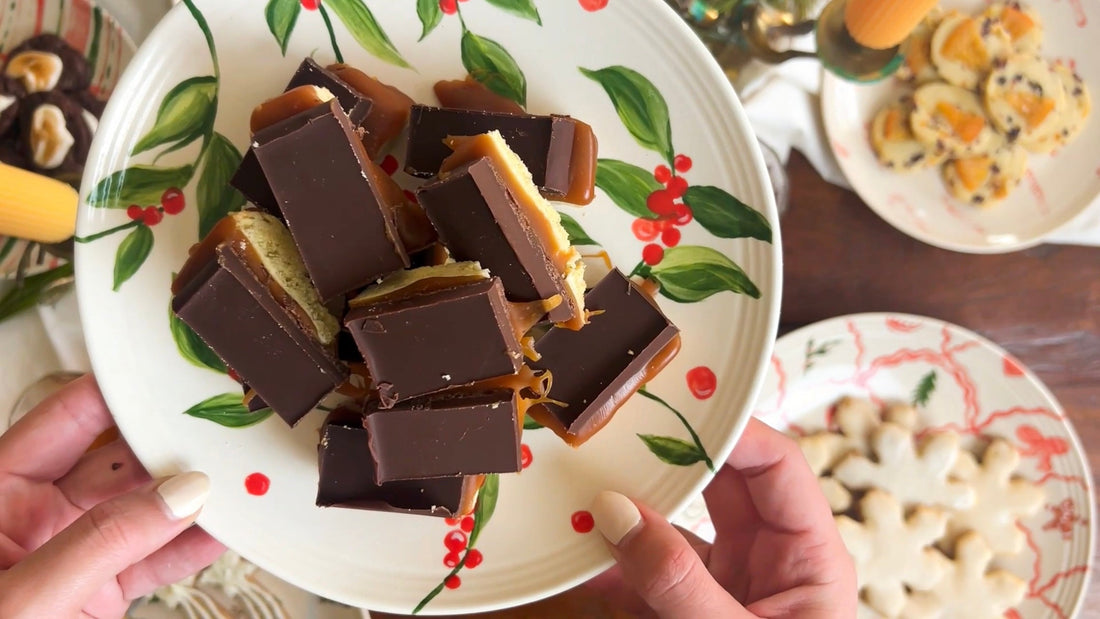
Greetings sweethearts, get ready to pamper that sweet tooth with our posh Millionaire Bars – a decadent affair where a buttery foundation dances with layers of lush caramel and velvety chocolate. This recipe, rooted in the simplicity of our Basic Butter Dough, takes everyday ingredients and transforms them into a treat fit for a queen.
Let's dive into the creation of these divine bars, where the elegance of our Basic Butter Dough becomes the canvas for a truly indulgent masterpiece.
Homemade Caramel
Making caramel at home is a rewarding process that requires a bit of patience but yields a rich, golden, and indulgent sauce. Here's a step-by-step tutorial on how to make caramel:
Ingredients:
- 1 cup granulated sugar
- 6 tablespoons unsalted butter, cut into pieces
- 1/2 cup heavy cream
- 1 teaspoon vanilla extract (optional)
- 1/2 teaspoon salt (optional, for salted caramel)
Instructions:
Step 1: Gather Your Ingredients
Ensure you have all your ingredients measured and ready. Making caramel can be a quick process, so having everything prepared beforehand is essential.
Step 2: Heat the Sugar
- Place granulated sugar in a heavy-bottomed saucepan over medium heat. Use a saucepan that's larger than you think you'll need to prevent overflow.
- Allow the sugar to melt gradually, stirring occasionally with a heat-resistant spatula or spoon. It will go through stages, starting with clumps and then turning into a thick amber-colored liquid.
Step 3: Add Butter
- Once the sugar has completely melted and reached a deep amber color, add the butter pieces to the saucepan.
- Be cautious as the mixture may bubble up when butter is added. Stir continuously until the butter is fully melted and incorporated.
Step 4: Incorporate Cream
- Slowly pour in the heavy cream while stirring constantly. Again, be cautious as the mixture can bubble up.
- Allow the caramel to boil for about 1-2 minutes, stirring continuously. This helps achieve a smooth and creamy consistency.
Step 6: Cool and Store
- Remove the caramel from heat and let it cool for a few minutes in the saucepan.
- Transfer the caramel to a heatproof container or jar. It will thicken as it cools.
Now, armed with this caramel-making tutorial, you can elevate your desserts and treats with the rich, velvety goodness of homemade caramel.

Additional Caramel Tips
In addition to using it to make these Millionaire Bars, use your homemade caramel as a topping for ice cream, drizzle it over desserts, or incorporate it into various recipes. Stored in the refrigerator, caramel can last for several weeks. Simply reheat gently before using if it becomes too thick.
Tips:
- Always exercise caution when working with hot sugar. Use a long-handled spatula or spoon and wear oven mitts if needed. Thankfully, I haven't had many bad burns in the kitchen, but all of the worst ones have been from some kind of molten sugar. It doesn't cool down on contact, and it's hard to wipe off. It might even be worth keeping a bowl of ice water close in case you do have an accident; just dunk your hand in the bowl.
- The color of the caramel depends on personal preference. Some prefer a lighter caramel for a milder flavor, while others enjoy a darker, more robust caramel.
- Stirring is crucial to ensure even melting and to prevent the sugar from burning.


The Chocolate Layer
Melting chocolate for the decadent chocolate layer of your Millionaire Bars is a straightforward process:
Ingredients
1 Cup of Chocolate Chips
1 Tbs of coconut oil (or butter)
Instructions:
Mix one cup of chocolate chips with a tablespoon of coconut oil (or butter) in a double boiler.
Keep mixing until it's all fully combined. If it seems too thick to drizzle, just add more oil until it reaches your desired consistency.
Notes:
- Choose Quality Chocolate: Opt for high-quality chocolate, either bars or chocolate chips, for a rich and smooth texture. Dark, milk, or a combination based on your preference works well.
- Use a Double Boiler or Microwave: There are two common methods for melting chocolate. The double boiler method involves placing a heatproof bowl over simmering water. The steam from the water gently melts the chocolate. Alternatively, you can melt chocolate in the microwave by heating it in short bursts, stirring between each burst.
-
Stir Frequently: Whether using a double boiler or microwave, stir the chocolate frequently to promote even melting. This prevents overheating and ensures a smooth consistency.
Following these simple steps will result in a beautifully melted chocolate layer that perfectly complements the buttery shortbread and rich caramel, creating Millionaire Bars that are truly irresistible.
Stay tuned for the next cookie in 12 Days of Cookies! If you missed the cookie number 10 click here. And while your'e here, check out these hand painted cookie plates.
Millionaire Bar Components
- Prep: 30 minutes
- Cook: 40 Minutes
- Total: 1 Hour and 10 Minutes
- Serving: 1 Bars
-
Yield: 20 Bars
Ingredients
- Prepared Basic Butter Dough
- Homemade Caramel (see directions above)
- Chocolate Chips (see directions above)

Directions for Millionaire Bars
- Preheat your oven to 350°F (175°C) and line and 8"x 8" baking pan with parchment paper. Make sure the paper overhangs on all sides for easy removal.
- Press the Basic Butter Dough into the pre-lined pan
- Bake for 12-15 minutes or until golden brown.
- Allow the cookie layer to cool completely.
- Once cooled, pour the caramel layer over the dough layer.
- Place it in the fridge to set for about 20 minutes
- Once the caramel layer has set, pour the melted chocolate over the caramel layer of your Millionaire Bars. Use a rubber spatula or the back of a spoon to spread it evenly.
- Let the chocolate layer set at room temperature or in the refrigerator until firm. This ensures a clean and glossy finish on your Millionaire Bars.
- Remove from the baking dish and cut into desired size.
- Enjoy!
Notes:
For easy cutting, use a serrated knife to score the chocolate, then, using a gentle rocking motion with a heavy knife, cut into squares or bars.