There I was, minding my own business, when a disturbing video came across my Instagram feed. It begins with a young woman unraveling a piece of rubber made from poisonous dyes, toxic sweeteners, and the dying screams of innocent fruit. She called it a "Fruit Roll Up". The woman then proceeds to use it to wrap a scoop of ice cream into a little tomb of insanity and sorrow.
With horror, I watched her put the frozen science project in her mouth and she .... liked it?
All kidding aside, my first thoughts when seeing this video were, "people still eat Fruit Roll Ups? ADULTS still eat Fruit Roll Ups?". A snack that seemed like a distant memory of a bygone era was still, in fact, relevant? In my optimistic naiveté, I had assumed that that particular over processed caricature of fruit had faded into obscurity, but it seems that I was wrong. This prompted me to refresh my memory on the ingredients of Fruit Roll Ups. I found the usual suspects; corn syrup, maltodextrin, palm oil, the oh-so-mysterious "natural flavors", and of course, our ever-present uninvited guests, Red 40, Yellows 5 and 6 and Blue 1. If you're not familiar with those, check out this blog post to read about them.
Despite my initial revulsion, I admitted to myself that this little internet confection had potential. So I set out to make a more natural version.
Enter, our hero: fruit leather
Fruit leather is the wise and peaceful Obi Wan Kanobi to Fruit Roll Ups corrupted Anakin Skywalker. It's simple to make, just blend up a fruit of your choice, citrus juice and sugar, apply some heat, and you're left with a chewy piece of "leather". It's great for snacking on its own, or making into the latest internet concoction.
Another reason I love fruit leather is that it's an opportunity to use fruit that is a little past its prime, or fruit that has been sitting in your freezer for too long. For this recipe, I used both, some windfall apples from my apple tree and frozen blackberries from last season.

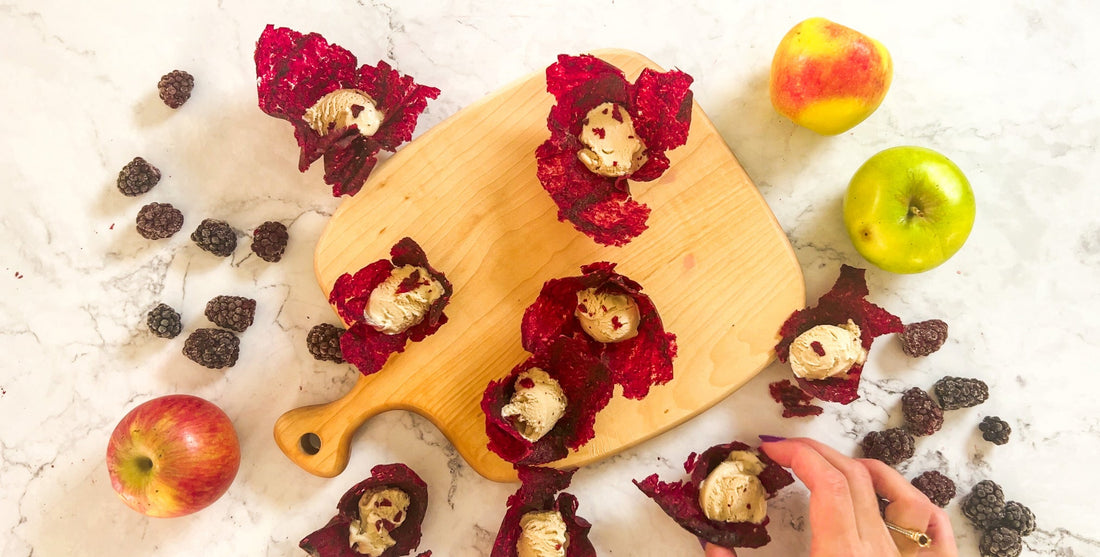
Once you have your fruit leather, get out a pan or tray that you can use as a "mould". For this recipe, I used a pop over pan, but an ice tray will work as well. While the fruit leather is still warm and malleable, I cut it into squares and pressed each square into the pop over tray. If it cools down too much and becomes rigid, just place it in the microwave and warm it back up again. Once you have your little fruit leather cups, scoop about a tablespoon of ice cream into each one. For this recipe, I used Van Leeuwens Earl Grey flavor that I am currently obsessed with. It pairs beautifully with the flavors of apple and blackberry. In the end, you are left with dramatic bouquets of fruity ice cream goodness that should be served immediately. You can stick them in the freezer for a few hours, but I found if you do it longer than that the fruit leather will become soft. Which isn't a bad thing, it will still taste great, but you will no longer have that crunch, ice cream combo.
Fruit Leather Ice Cream Cups
- Prep: 30 Minutes
- Cook: 3 Hours
- Total: 3 1/2 hours
- Serving: 1 Cup
- Yield: About 16 cups
Ingredients
- 2 cups of apples
- 1 cup of blackberries
- 1 tbs of lemon juice
- 2 tbs of brown sugar
- water
- Earl Grey Ice Cream

Directions
For the Fruit Leather
- Preheat your oven to 250°
- Start by washing and coring your apples and blackberries. As a general rule, you want to avoid any large seeds or pits
- Cut the apples into smaller pieces to make it easier for your blender to process.
- Put the fruit, lemon juice and brown sugar into your blender. The sugar is optional. If you think the fruit is sweet enough on its own, then feel free to omit the sugar.
- Add about 1/4 cup of water to start the blending. Keep adding small amounts of water until your blender is able to process the fruit. To be clear, we want to add as little water as possible.
- Once blended, pour the mixture into a pot and simmer to cook some of the water out. You want to cook it down util its rather thick, but not a paste.
- Once it has reached the desired consistency, turn the heat off and let it cool a bit.
- While your mixture is cooling, line two rimmed baking sheets with parchment paper
- Pour half the mixture onto the parchment and smooth it out with a spatula. Take care not to get it on the edges of the baking sheet or off of the parchment paper.
- Pour the other half of the mixture on the second baking sheet and repeat the same process.
- Once you have your desired thickness, place the sheets in the oven and bake them for 3 hours or until your fruit leather is no longer tacky to the touch.
- Once finished, cut the sheet of fruit leather into squares that are roughly 3" x 3". This will depend on the type of tray or mould you are using to create the cups, so adjust accordingly.
For the Cups
- While the leather is still warm and malleable, press it into your chosen mould. Let each piece cool in the moulds until hard.
- If your fruit leather has cooled to the point where its no longer malleable, just pop it in the microwave to warm it up again.
- Once you have your cups, scoop a small amount of Earl Grey ice cream into each one.
- Serve immediately.